In this article I present a step-by-step walkthrough of my photography workflow. I won't go through all the details of every piece of software I mention, they have their own manuals and documentation for that, I will highlight the operations I do.
My main goals are:
- Full ownership of all my data, no third-party services.
- Use free-software (as in freedom, not as in free beer) exclusively.
- Speed up common operations: download of new photos, editing, post-processing.
- Organize collection with metadata.
- Automated sync and backup.
- (In the future) Transparent access and sharing of photos.
1. Download photos with Digikam
I use the fantastic Digikam software to organize my whole photo collection (181708 photos and 3127 videos in 2198 albums as of March 2022). I use it to download photos from my cameras because it has a useful "Only new items" filter, so on connect I would only see whatever is new.
Most of my photos are classified in albums by date, Digikam also helps with this as I can select all photos taken on the same date with a click on its section title, then I use "Download Selected" option.

Digikam then asks where to download, and I can create a new album right then and there.

I set the album category, description and date so I don't forget later.

2. Browse with Geeqie
Once all photos are downloaded I switch to Geeqie to browse through them and remove all bad ones (unfocused, blurry, under or overexposed, etc.) I have been using it ever since it was called GqView, and by now it's mostly the force of habit.
At this point I would mention that I shoot in JPEG+RAW mode in my cameras, even if I always post-process the RAW file and delete the camera-generated JPEG. The reason is that I like being able to zoom-in to look at the details of a photo so I can delete the bad pictures early in the pipeline, and RAW images usually have a reduced preview size (for example the RAW files created by my Sony A7 III have an embedded 1616x1080px preview, which is small for a 4K display).
There are two features that are indispensable to me at this stage:
- Group files so I only see the JPEG version, while deleting all files in the group.
- Keep zoom and view position when browsing through images.
File grouping means that by default Geeqie will only show the JPEG file of each photo, while the RAW file and potential sidecars (e.g. XMP or PP3) are hidden away, but still only one click away. Then when a file is deleted all the files in the same group are deleted as well. Sidecar grouping works well by default, but if necessary it can be tweaked it in Preferences:

The other thing I need is the ability to zoom in to 100% of a photo, then quickly move to the next or previous photo to compare them and, most importantly, that the view stays in the same position, i.e. that it doesn't reset to the top-left corner of the image or something like that, like some image viewers do. Geeqie has this behavior by default, and combined with some keyboard shortcuts (Z for 100% zoom, X for zoom-to-fit and PgUp and PgDn keys for navigation) it does the trick for me.
I want to mention that I am aware that Digikam has a Lightroom feature, which can be used to browse images by pairs: you can see an image on the left side, the next one on the right side, and when zooming or moving either panel Digikam will keep the other in sync. It works nicely but has a big caveat for me: when deleting a photo it won't delete the associated RAW file, leaving it orphan. I haven't found a way of solving this, except running a script to delete all orphan files or to shoot only RAW files (but then I would lose on preview resolution), which is why I'm sticking to Geeqie for now.

3. Process RAWs with RawTherapee
Nowadays I process most of my photos in RawTherapee, a sensational piece of free software which is both very easy to use and produces very high-quality pictures. In the past I have used Darktable and while it's more featureful I was having a harder time getting the results I wanted most of the time, mainly because RawTherapee's noise reduction works better.
In any case, I open the album directory in RawTherapee, apply a base profile to all pictures, and then apply partial profiles to sharpen low-noise images, use a mild noise reduction for mid-ISO images and heavy noise reduction to high-ISO ones. I use the filter feature to select only RAW files and then subfilter by ISO range as necessary.


Then I correct all photos for lens distortion. Automatic lens recognition fails for me for some reason, so I use Batch Edit, select all photos in the album and manually select the camera and lens.

Then I go over the individual photos, making manual adjustments: exposure, white balance, cropping, etc. This is regular RawTherapee editing so I won't go into details at this point. If you are interested feel free to send me a message and I would consider doing a separate blog post about it.
When everything is ready I add photos to the queue and export to the same directory the
RAW files are (%p1/%f as Output Location template). When I need to further retouch
some photo (usually in GIMP) I export to TIFF as JPEG is a lossy format and would lose
more quality on any additional reencodings.

4. Organize in Digikam
Once RawTherapee is finished exporting I delete the camera-generated JPEGs, then go back to Digikam and Refresh the album to see the new exported files.
Next step is to group the photos by name, so I only see the JPEGs and not the RAWs. In the album, I Select all items (CTRL+A) then right click on any of them and Group → Group Selected by Filename.

Then I use the face detection feature to have Digikam recognize the faces of the people in the photos. I Select All (CTRL+A), then right click and Scan for Faces. When the process is done I go to the People tab to review the results, accept the good ones and manually correct the bad ones.
Next is to review captions and tags. Tag organization is something personal, but I make
use of the hierarchical structure supported by Digikam for tags, so for example I use
location tags like place → Colombia → Zapatoca. I also tag people in the
photos, face detection fails to find faces sometimes but I still want the ability to
filter my whole collection to find one or more people.

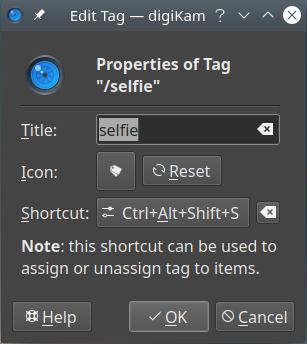
To speed up tagging the most common tags I assign shortcuts to the ones I use the most. Just edit the properties of a tag with a right click and set the shortcut there:
Last step is to rank the photos using 1-5 stars, I double click on the first one then use keyboard shortcuts to set the ranking (CTRL+1 through CTRL+5, those are the defaults) and the arrow keys to move through them. How to use rankings is again something personal, but this is the logic I use for my collection:
- 1 star: Bad quality or a dupe. Not worth seeing unless I'm looking for something specific, i.e. if I were showing the album to somebody else I would likely filter these out.
- 2 stars: This is my go-to ranking if I'm in doubt. Not bad quality and has something going for it, but skippable if only looking for the best photos in the album.
- 3 stars: Representative photo for the album, i.e. if I were to only show the 3-or-more-star photos from an album the viewer would get a good feeling of it without having to seat through too many pictures.
- 4 stars: Good photo: sharp, good lightning and composition. If I would search for a photo across the whole collection and not looking at an specific album that means it's a 4-star.
- 5 stars: Great photo, either technically or because it has a special meaning to me (outstanding photo of my daughter for example). Photos I feel proud of.
This organization gives me the power to filter my connection the way I need to, e.g. finding all pictures with all members of my family that are 4 stars or higher, and maybe filter by a date range too.
Once everything is done I move the album from my Pictures to sort to the Pictures collection with a simple drag & drop. From there it will be automatically replicated to my home server.
5. Replication with Syncthing
I use Syncthing to replicate data between my devices (computer, server, smartphone). It works like a charm and it's an instant recommendation from me, hands down.
Specifically for the photo workflow I sync two directories between my computer and my home server:
- The pictures directory where the organized photos live.
- Digikam's data directory, which has SQLite databases. I have them separate from the photo collection because historically it was in a HDD while my main drive was NVMe, so performance was much better if the databases were in the latter.
I set both directories as send-only in my computer, and read-only in the server:

I also set up version control on the server side so I have an easy recovery in case of mistakes:

The home server has 4 HDDs, one of which is set up for parity with SnapRAID for fault tolerance. For details about my home server setup check out my homelab article.
6. Backup with restic
My home server does a weekly incremental backup to Wasabi using restic. This includes my full photo collection plus any other personal data that would not be recoverable in case of a catastrophe. You can see my restic script and tailor it to your purposes. I generate the include and exclude files with Ansible. The backup script is then run by cron every week.
Why restic? I read good comments about it back when I implemented this scheme, that it does things the Right Way™, and it has been working reasonably well since then. However if I had to do it again I would look into Borg as an alternative, but I might end up choosing restic again.
Why Wasabi? It has an S3-compatible API and the cheapest prices I could find, cheaper than Backblaze, especially when considering that it has no egress fees.
Of course the backup is encrypted.
End words
This workflow is the evolution of 20 years of digital photography. I hope you learned something from it that you can apply to your own needs. I will update this blog post as I make further tweaks to the tools I use.
You might be wondering about the last of my stated goals, "transparent access and sharing of photos". I am currently working on creating a web gallery software that will give access to my full photography collection and allow navigating it using the Digikam metadata. The software will run in my home server, where the photo collection is automatically synced. This means that after I organize my photos in Digikam I will be able to access them from any device while keeping full control over the data and without having to upload the data anywhere else. I will release the software as open source when its basic features are working, so stay tuned!
If you have any comments, suggestions or feedback I would love to hear about it; feel free to tag me in social media or send me a direct message. Check out my personal website for contact information.
Updates
- 2022-04-05: Fixed RawTherapee name. Thank you for the hilarious comments, Hacker News.
- 2024-01-01: Included link to homelab article.